Since 17.10, netplan has been the default network configuration tool in Ubuntu. Since then, it has grown in features, bug fixes, and even got its package renamed in the archive from "nplan" to netplan.io. We added better routing, improved handling for bridges, support for marking devices as "optional" for boot (so that the system doesn't wait for them to come up at boot time), lots of documentation updates... There's even been work to get it building for other distros.
We have a website for it, too: netplan.io
As we get closer to the release of Ubuntu 18.04, it is past due to involve everyone in testing netplan and making sure it is solid and as featureful as possible for a wide range of use cases.
This is where you get to participate.
Let us know about any feature gaps that remain in what
netplan supports, so that we can add the features when it's possible, or so that these feature gaps can be properly documented if they can't be closed by release time.
Report any bugs you find in netplan on Launchpad.
If you are unsure whether something is a bug, it might well be, so it doesn't hurt to file a bug. At the very least, we do want to know if something feels really difficult to do, so we can look into improving the experience.
If you're unsure how to do something you can look up questions and answers, or add your own, on AskUbuntu here:
https://askubuntu.com/questions/tagged/netplan
Netplan is being actively developed and we can use your help; so if there's one feature you care deeply about, or a bug that bugs you and you want to have a hand in fixing it, you can also jump right in to the code in Github: http://github.com/CanonicalLtd/netplan
Showing posts with label QA. Show all posts
Showing posts with label QA. Show all posts
Thursday, 15 March 2018

Thursday, 5 November 2015
One manpage a day...
I first heard of this in a Google Doc, which was linked to by a wiki page in Swedish I was shown by someone on IRC. Unfortunately, I can't find any of these links anymore...
Documentation in some areas of Ubuntu is sorely lacking. Have you ever ran into a case where you tried to use this shiny new program, or do a one-shot use of some obscure old thing, without managing to find any documentation for it?
One of the first things we're trained to do as Unix users is to look for the manpage for a command. Many packages are missing manpages. Any missing manpage can be considered as a bug for a program, since it means we're missing documentation for it, and people who might use that software would have no idea how to use it, or perhaps would have no idea how to use it effectively, how to make the most of the available features.
Two such examples I found on my own system, looking at the contents of /usr/bin are ubuntu-drivers (pkg:ubuntu-drivers-common) and ubuntu-support-status (pkg:update-manager-core). I'm not trying to point fingers at anything (in fact, I've contributed to ubuntu-drivers before, too), just showing that examples of commands missing a manpage can be trivially found.
Let's all try to find one manpage to write a day, and we'll quickly improve the state of documentation in Ubuntu by a noticeable amount. Try to write the manpage, but otherwise at least file a bug for the fact that it's missing, against the package that contains that binary.
For convenience; here's a command to get a list of commands that man couldn't find a manpage for in /usr/bin (there may well be a better way to do this, and it will list some false-positives):
ls -1 --file-type /usr/bin | sed 's/@//' | LC_ALL=C xargs -n1 man -w >/dev/null
Then, to find out which package contains that binary, use dpkg -S with the name of the command.
Thanks to Stefan Bader, Colin King and Louis Bouchard for a stimulating discussion on documentation this morning. :)
Documentation in some areas of Ubuntu is sorely lacking. Have you ever ran into a case where you tried to use this shiny new program, or do a one-shot use of some obscure old thing, without managing to find any documentation for it?
One of the first things we're trained to do as Unix users is to look for the manpage for a command. Many packages are missing manpages. Any missing manpage can be considered as a bug for a program, since it means we're missing documentation for it, and people who might use that software would have no idea how to use it, or perhaps would have no idea how to use it effectively, how to make the most of the available features.
Two such examples I found on my own system, looking at the contents of /usr/bin are ubuntu-drivers (pkg:ubuntu-drivers-common) and ubuntu-support-status (pkg:update-manager-core). I'm not trying to point fingers at anything (in fact, I've contributed to ubuntu-drivers before, too), just showing that examples of commands missing a manpage can be trivially found.
Let's all try to find one manpage to write a day, and we'll quickly improve the state of documentation in Ubuntu by a noticeable amount. Try to write the manpage, but otherwise at least file a bug for the fact that it's missing, against the package that contains that binary.
For convenience; here's a command to get a list of commands that man couldn't find a manpage for in /usr/bin (there may well be a better way to do this, and it will list some false-positives):
ls -1 --file-type /usr/bin | sed 's/@//' | LC_ALL=C xargs -n1 man -w >/dev/null
Then, to find out which package contains that binary, use dpkg -S with the name of the command.
Thanks to Stefan Bader, Colin King and Louis Bouchard for a stimulating discussion on documentation this morning. :)
Tuesday, 21 January 2014
Call for testing: urfkill / Getting flight mode to rock on Ubuntu and Ubuntu Touch
Last month, I blogged about urfkill, and what it's meant to be used for.
The truth is, flight mode and proper killswitch (read: disabling radios on devices) handling is something that needs to happen on any device that deems itself "mobile". As such, it's one thing we need to look into for Ubuntu Touch.
I spent the last month or so working on improving urfkill. I've implemented better logging, a way to get debugging logs, flight mode (with patches from my friend Tony Espy), persistence, ...
At this point, urfkill seems to be in the proper state to make it, with the latest changes from the upstream git repository, into the distro. There is no formal release yet, but this is likely to happen very soon. So, I uploaded a git snapshot from the urfkill upstream repository into Trusty. It's now time to ask people to try it out, see how well it works on their systems, and just generally get to know how solid it is, and whether it's time to enable it on the desktop.
In time, it would be nice to replace the current implementation we have of killswitch persistence (saving and restoring the state of the "soft" killswitches) currently in two upstart jobs — rfkill-store and rfkill-restore — with urfkill as a first step, for the 14.04 release (and to handle flight mode on Touch, of course). In the end, my goal would be to achieve convergence on this particular aspect of the operating system sooner than later, since it's a relatively small part of the overall communications/networking picture.
So I call on everyone running Trusty to try to install the urfkill package, and file bugs or otherwise get me feedback on the software. :)
The truth is, flight mode and proper killswitch (read: disabling radios on devices) handling is something that needs to happen on any device that deems itself "mobile". As such, it's one thing we need to look into for Ubuntu Touch.
I spent the last month or so working on improving urfkill. I've implemented better logging, a way to get debugging logs, flight mode (with patches from my friend Tony Espy), persistence, ...
At this point, urfkill seems to be in the proper state to make it, with the latest changes from the upstream git repository, into the distro. There is no formal release yet, but this is likely to happen very soon. So, I uploaded a git snapshot from the urfkill upstream repository into Trusty. It's now time to ask people to try it out, see how well it works on their systems, and just generally get to know how solid it is, and whether it's time to enable it on the desktop.
In time, it would be nice to replace the current implementation we have of killswitch persistence (saving and restoring the state of the "soft" killswitches) currently in two upstart jobs — rfkill-store and rfkill-restore — with urfkill as a first step, for the 14.04 release (and to handle flight mode on Touch, of course). In the end, my goal would be to achieve convergence on this particular aspect of the operating system sooner than later, since it's a relatively small part of the overall communications/networking picture.
So I call on everyone running Trusty to try to install the urfkill package, and file bugs or otherwise get me feedback on the software. :)
Wednesday, 7 March 2012
Call for testing: BlueZ A2DP and HSP/HFP profiles
We just landed bluez 4.98-2ubuntu2 in Precise. The key change was to enable the Source and Gateway profiles by default, which will now allow people to use their system as an audio output device. It works great on Android, but any help in testing this on a bunch of different devices (especially on iPhone) would be much appreciated!
The Source profile is what enables the A2DP bluetooth profile. With it, you can use your system as a stereo audio output device: in other words, you can send output audio from an external device such as a phone or a tablet to your computer (though this will require a bit of work on the PulseAudio side to get the audio stream to go through the right devices).
There's the AskUbuntu question "Can I use my computer as an A2DP receiver?" that describes the steps to use this right now. Thanks to Steve Langasek for figuring out the details. I've also written a draft script that implements the suggested steps and makes it simple:
That script is meant to be called as '"whatever_you_named_it" enable'. Don't forget the "enable" part, or "disable" to turn off the streams, otherwise it won't work.
The Gateway profile enables the HSP/HFP bluetooth profiles. This means we're getting closer to supporting phone calls from a bluetooth-connected phone on a Ubuntu computer. There's already some amounts of support for this via Ofono and the telepathy-ring project, although there is some extra work needed -- hopefully we can fix this by the Precise release. :D
The Source profile is what enables the A2DP bluetooth profile. With it, you can use your system as a stereo audio output device: in other words, you can send output audio from an external device such as a phone or a tablet to your computer (though this will require a bit of work on the PulseAudio side to get the audio stream to go through the right devices).
There's the AskUbuntu question "Can I use my computer as an A2DP receiver?" that describes the steps to use this right now. Thanks to Steve Langasek for figuring out the details. I've also written a draft script that implements the suggested steps and makes it simple:
#!/bin/sh

BTSOURCE=`pactl list short sources | grep bluez_source | awk '{print $2;}'`
SINK=`pactl list short sinks | grep -v Monitor | grep alsa_output.pci | awk '{ print $2; }'`

case $1 in
enable)
 pactl load-module module-loopback source=$BTSOURCE sink=$SINK
 ;;
disable)
 pactl unload-module $(pactl list short modules | grep loopback | grep $BTSOURCE | cut -f 1) || true
 ;;
esac
That script is meant to be called as '"whatever_you_named_it" enable'. Don't forget the "enable" part, or "disable" to turn off the streams, otherwise it won't work.
The Gateway profile enables the HSP/HFP bluetooth profiles. This means we're getting closer to supporting phone calls from a bluetooth-connected phone on a Ubuntu computer. There's already some amounts of support for this via Ofono and the telepathy-ring project, although there is some extra work needed -- hopefully we can fix this by the Precise release. :D
Wednesday, 25 August 2010
Ubuntu Global Jam in Montreal: help testing and fixing bugs in Maverick
We're doing it again!
Here in Montreal we're just about ready to start jamming this weekend. Rooms have been confirmed, and we already have a fair amount of interest from what I can see in the LoCo directory event listing! We're also happy to have been sharing ideas and plans with txwikinger who's been organizing the Global Jam event in the Waterloo/Kitchener area in Ontario.
Do you want to help make Ubuntu better?
Do you look forward to meeting some of the people who do testing, triaging and bug fixing on Ubuntu in Montreal, and maybe ask them to look at your own little pet-peeve bugs?
Then come join us at the SupInfo Montréal offices this Saturday, starting from 9am! All you need to bring is a computer and willingness to participate. :)
If you choose to pass by, please let us know by registering for the event on the LoCo Directory... just so we know roughly how many people to expect.
You can get all of the information about our event on the QuebecTeam wiki: QuebecTeam/GlobalJam.
As a side note, we should have a local archive mirror, and copies of maverick and lucid ISO images. I've spent the past weeks preparing it on a portable USB hard drive, after getting some help in starting from Dustin Kirkland. Thanks Dustin!
Here in Montreal we're just about ready to start jamming this weekend. Rooms have been confirmed, and we already have a fair amount of interest from what I can see in the LoCo directory event listing! We're also happy to have been sharing ideas and plans with txwikinger who's been organizing the Global Jam event in the Waterloo/Kitchener area in Ontario.
Do you want to help make Ubuntu better?
Do you look forward to meeting some of the people who do testing, triaging and bug fixing on Ubuntu in Montreal, and maybe ask them to look at your own little pet-peeve bugs?
Then come join us at the SupInfo Montréal offices this Saturday, starting from 9am! All you need to bring is a computer and willingness to participate. :)
| SupInfo Montréal | |
| 752 Rue Sherbrooke Ouest | |
| Montreal | |
| Canada | |
| http://www.supinfo.com/en/News0eaaf665-d9bf-4563-befb-ac97f8b035c2.aspx |
If you choose to pass by, please let us know by registering for the event on the LoCo Directory... just so we know roughly how many people to expect.
You can get all of the information about our event on the QuebecTeam wiki: QuebecTeam/GlobalJam.
As a side note, we should have a local archive mirror, and copies of maverick and lucid ISO images. I've spent the past weeks preparing it on a portable USB hard drive, after getting some help in starting from Dustin Kirkland. Thanks Dustin!
Monday, 28 June 2010
Wubi: installing Ubuntu inside Windows
Do you know about Wubi?
Wubi is a very nice tool if you want to try out Ubuntu for the first time. It allows you to install Ubuntu alongside Windows, without re-partitioning your hard-drive. All this from the CD-ROM if you load it in computer while Windows is running, or downloadable as a standalone app.
The Ubuntu QA team is always looking for help to test installing Ubuntu using Wubi. It's both a great way to try Ubuntu if you really still need to run Windows on your computer and want to help out with testing Ubuntu, or as any kind of first jump into testing and QA. Testing efforts are being tracked on the Ubuntu ISO Tracker. If you want to help, please read the documentation first.
So if you chose to download Wubi's standalone application, double-click on its icon, or load in the Ubuntu CD-ROM you may have just burned (or received from shipit or your LoCo team).
If you're using a CD-ROM, Wubi should start automatically (or in Windows 7, you should see an autorun dialog).


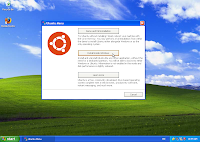 The install application gives you three choices. The first one being to reboot your system and use the CD-ROM directly to demo and install Ubuntu, the third sends you to the Ubuntu website.
For the purpose of this post I will instead walk you through option 2, which is to install Ubuntu alongside Windows, from within Windows.
 You will then be presented with all the questions that make sure the installer knows everything it needs to know about the installation of Ubuntu you want to do. Choose your username, password, and where you want to install Ubuntu (which Windows harddrive, C:, D:, or whatever), what language you want to see Ubuntu in, etc.
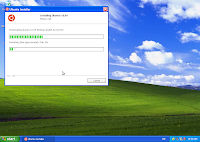 If you're using the standalone Wubi app, you will need to wait a bit while the Ubuntu CD ISO image is being downloaded. The image is necessary, as the standalone app does not contain the required packages for the install.
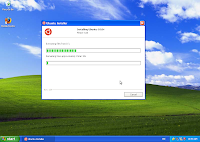 Wubi will then proceed to the next part of the installation, which is to copy everything it needs to your hard drive in a ubuntu folder on the hard drive you selected in the preceeding screen.
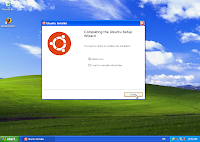 Once the first part of the installation is over, select what you want to do... my preference is to reboot right away and carry on with the rest of the installation procedure.
 Once your computer has booted, you will be presented with a menu. That menu will time out and default to Windows after a few seconds. Choose Ubuntu to continue with the installation.
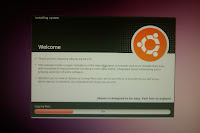 You are now booting into the real thing: at this point you are in Ubuntu, but the installation isn't quite done yet, so grab a (quick) coffee while the last tidbits get copied and configured.
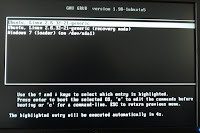 At the end of the second part of the installation, your computer will reboot again, present you again with the first menu where you will want to choose Ubuntu, and show an additional menu where you can choose to start Ubuntu in recovery mode, should you need to fix a broken installation. From there, you can also go back to Windows.
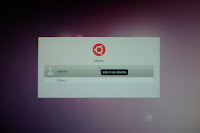 Voilà, the installation is done. At this point, all that is left to do is click on your username in the lis and enter the password you chose back in Windows during the first phase of the installation to get to the Ubuntu desktop.
Wubi is a very nice tool if you want to try out Ubuntu for the first time. It allows you to install Ubuntu alongside Windows, without re-partitioning your hard-drive. All this from the CD-ROM if you load it in computer while Windows is running, or downloadable as a standalone app.
The Ubuntu QA team is always looking for help to test installing Ubuntu using Wubi. It's both a great way to try Ubuntu if you really still need to run Windows on your computer and want to help out with testing Ubuntu, or as any kind of first jump into testing and QA. Testing efforts are being tracked on the Ubuntu ISO Tracker. If you want to help, please read the documentation first.
So if you chose to download Wubi's standalone application, double-click on its icon, or load in the Ubuntu CD-ROM you may have just burned (or received from shipit or your LoCo team).
If you're using a CD-ROM, Wubi should start automatically (or in Windows 7, you should see an autorun dialog).


 The install application gives you three choices. The first one being to reboot your system and use the CD-ROM directly to demo and install Ubuntu, the third sends you to the Ubuntu website.
For the purpose of this post I will instead walk you through option 2, which is to install Ubuntu alongside Windows, from within Windows.
 You will then be presented with all the questions that make sure the installer knows everything it needs to know about the installation of Ubuntu you want to do. Choose your username, password, and where you want to install Ubuntu (which Windows harddrive, C:, D:, or whatever), what language you want to see Ubuntu in, etc.
 If you're using the standalone Wubi app, you will need to wait a bit while the Ubuntu CD ISO image is being downloaded. The image is necessary, as the standalone app does not contain the required packages for the install.
 Wubi will then proceed to the next part of the installation, which is to copy everything it needs to your hard drive in a ubuntu folder on the hard drive you selected in the preceeding screen.
 Once the first part of the installation is over, select what you want to do... my preference is to reboot right away and carry on with the rest of the installation procedure.
 Once your computer has booted, you will be presented with a menu. That menu will time out and default to Windows after a few seconds. Choose Ubuntu to continue with the installation.
 You are now booting into the real thing: at this point you are in Ubuntu, but the installation isn't quite done yet, so grab a (quick) coffee while the last tidbits get copied and configured.
 At the end of the second part of the installation, your computer will reboot again, present you again with the first menu where you will want to choose Ubuntu, and show an additional menu where you can choose to start Ubuntu in recovery mode, should you need to fix a broken installation. From there, you can also go back to Windows.
 Voilà, the installation is done. At this point, all that is left to do is click on your username in the lis and enter the password you chose back in Windows during the first phase of the installation to get to the Ubuntu desktop.
Subscribe to:
Posts (Atom)